

Author: Lisa Childs
Comments: 1
Category: Dessert Recipes
Published Date: September 21, 2021
Updated Date: January 12, 2023
Jump To Recipe
This post may contain affiliate links, which means I earn a small commission if you purchase something I recommend - at no additional cost to you! Thank you for supporting this blog!
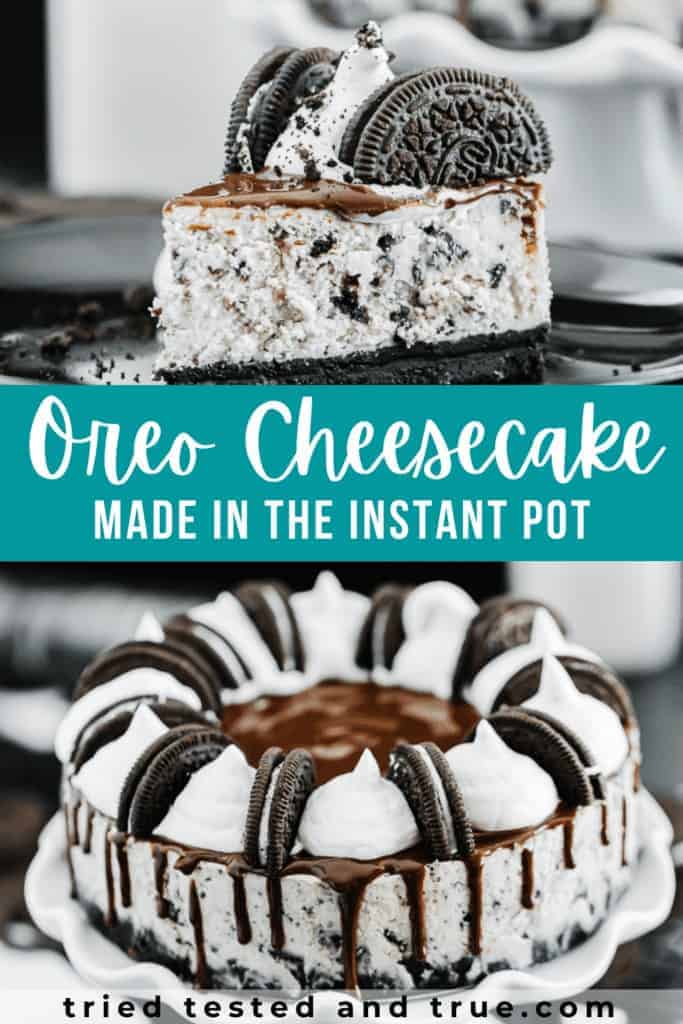
Instant Pot Oreo Cheesecake combines two of life’s greatest treasures: Oreos and cream cheese! This recipe uses two blocks of cream cheese and cooks in a 7 inch cheesecake pan.
Instant Pot oreo cheesecake recipe
These Instant Pot cheesecake recipes keep striking home with you guys, so I’ll keep making them! This time, I have an Instant Pot spin on a family classic: the Oreo cheesecake.
You asked, and I made it. This recipe is perfect as an after-dinner treat, but decadent enough to make a stunning centerpiece for any gathering.
Using a pressure cooker to make cheesecake might feel odd, but I promise that it’s the perfect way to make a foolproof cheesecake.
The Instant Pot eliminates a lot of the potential pitfalls and stress of the conventional baking method, making it ideal for beginners and seasoned bakers alike!
For more information on the mechanics of baking a cheesecake in an Instant Pot (and why it’s a great idea), read my Classic Instant Pot Cheesecake post.
Instant Pot cheesecake with oreo crust
I said that this cheesecake was decadent, and I wasn’t joking. A lot of the magic of this cheesecake comes from the Oreo crust.
Take several Oreos, crush them in a bag or blender, and add some butter.
I have tested this recipe using an Oreo base with additional sugar, flour, and butter and creating an Oreo dough, as well as using straight Oreos with butter. I actually prefer the crust with just Oreos and butter
This crust recipe uses one “sleeve” of Oreos that is about ¼ inch thick, but if you want an extra thick crust, you may double the crust recipe.

Can you freeze Instant Pot cheesecake?
Didn’t finish it all? No worries! Whether you’re storing leftovers or preparing for an upcoming party, this Instant Pot cheesecake freezes easily.
Depending on your intent, you can either freeze the whole cheesecake at once, or wrap individual slices.
To freeze a whole cheesecake made in your Instant Pot, first let the cheesecake cool completely on the counter to room temperature, then refrigerate overnight.
Remove the cheesecake from the pan, and place it on a cake board or a freezer-safe plate.
Wrap the cheesecake tightly with plastic wrap, taking care not to leave any exposed edges. I like to double wrap mine just to be safe!
Once your cheesecake is wrapped, you can freeze it with no worries for 2-3 months. If you would like to freeze for longer than that, I recommend taking the whole cheesecake that has been wrapped in plastic wrap and wrapping it in a layer of heavy duty foil or using a food saver to vacuum-seal the whole cheesecake.
To serve a frozen cheesecake, remove it from the freezer the night before serving and let thaw in the fridge for about 24 hours.
Taking a cheesecake directly from the freezer and letting it thaw at room temperature is not recommended for food safety reasons, as well as the condensation that will form and could make your cheesecake crust soggy.
Instant Pot cheesecake pan
You’ll need an Instant Pot cheesecake pan to make this recipe. There are basically two types of cheesecake pans out there- springform, and push.
A springform pan hugs the outside of the Oreo cheesecake and you use a lever to release the cheesecake from the base that fits snugly into the outer shell.
A push pan is exactly what it sounds like. You push the bottom up to remove it from the pan.
I prefer to use a push pan over a springform pan to make Oreo cheesecake in the Instant Pot.
I’ve owned springform pans, but they’ve broken. My thought is that the more moving parts there are, the higher the likelihood that it’ll break.
My exact Instant Pot cheesecake pan is discontinued, but I like this similar push pan best because it is super high quality and has a handle. The bottom of the pan hasn’t warped at all, and it’s dishwasher safe (a must for me!)
Read my Post on the Top 10 Instant Pot Accessories to Buy (and AVOID!)
How to make Instant Pot Oreo cheesecake
To make this Oreo cheesecake, you’ll need to assemble three separate components: the crust, the filling, and the ganache topping.
To make the crust, you’ll blend up a stack of oreos and then mix up those yummy crumbs with melted butter to make a dark, crumbly, deliciously rich casing for your cheesecake.
Use a flat glass to press the mixture evenly into your pan, transitioning to your fingers if you’d like to extend the crust up the sides of the pan.
I prefer to press a single layer on the bottom of the pan, because I prefer the look after you release it from the pan. Sometimes, the crust can “fall” off the cheesecake if you press it up on the sides of the pan. It’s a personal preference.
It’s incredibly important to ensure your cheesecake ingredients are room temperature.
When your cream cheese, eggs, and other cold ingredients are room temperature, they blend together much better and you’ll avoid a lumpy Oreo cheesecake.
How to make Oreo Cheesecake Filling
To make the filling, beat together the cream cheese and sugar until glossy and smooth, then add in the other ingredients for the filling and continue to blend.
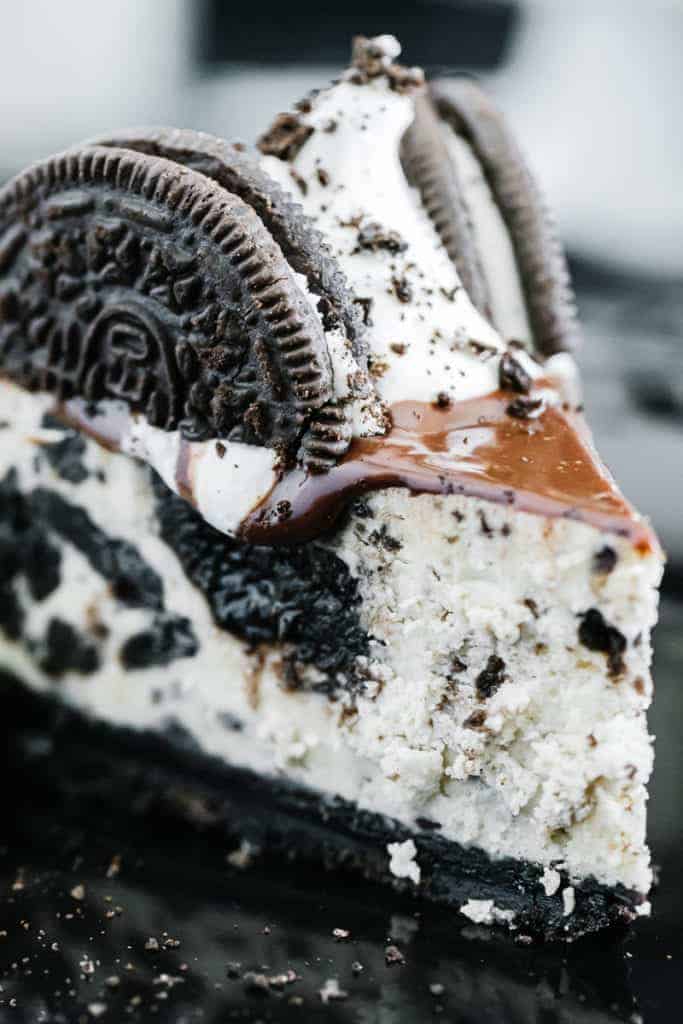
The best part is adding the Oreos! You’ll add 12 right into the batter itself, lightly beating them so that they’re crunched up and mixed throughout.
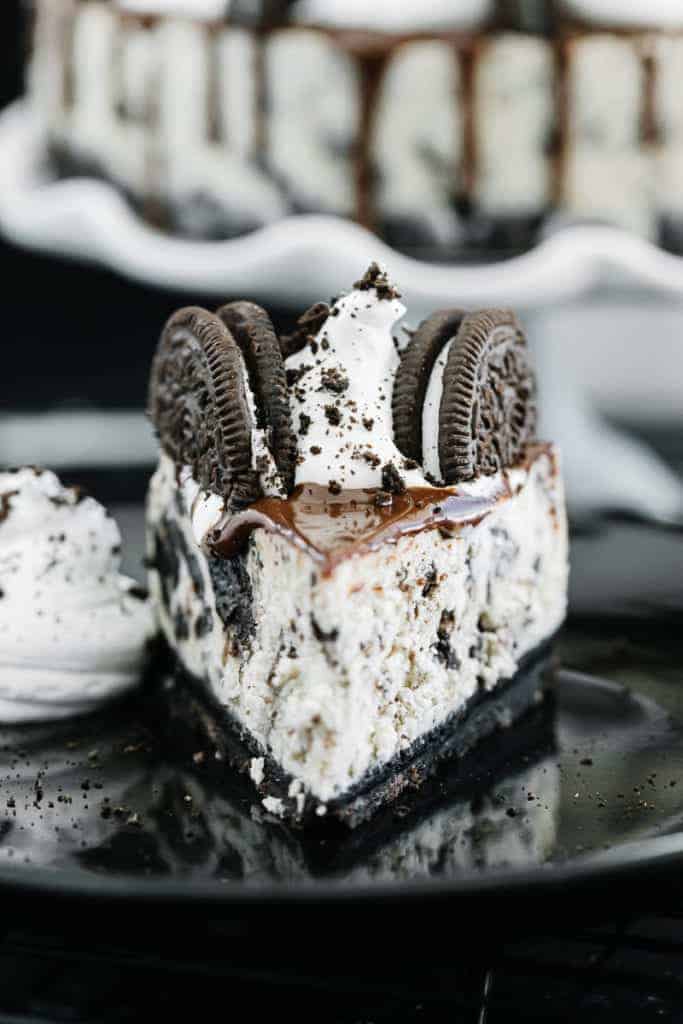
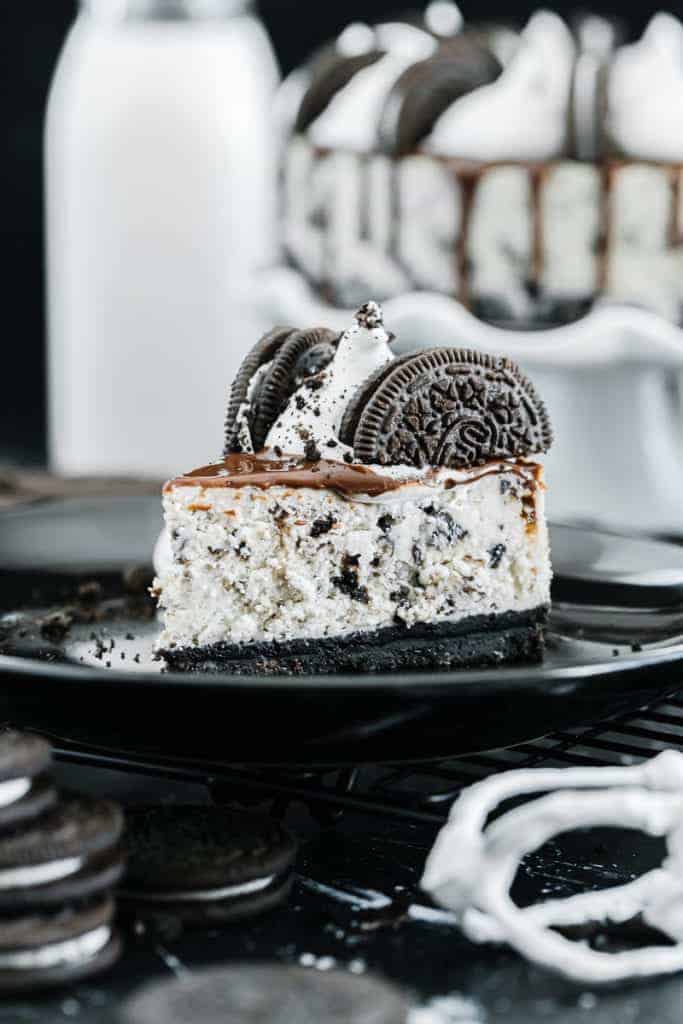
Pour about half of the batter into your pan that’s already lined with the crust, then add five whole Oreos on top of the batter.
This creates really beautiful cross sections when you cut the Oreo cheesecake when serving. The Cheesecake Factory has an Oreo Dream Extreme Cheesecake that does this, and it’s my favorite! You can do 5, or 10-12 Oreos to create multiple layers.

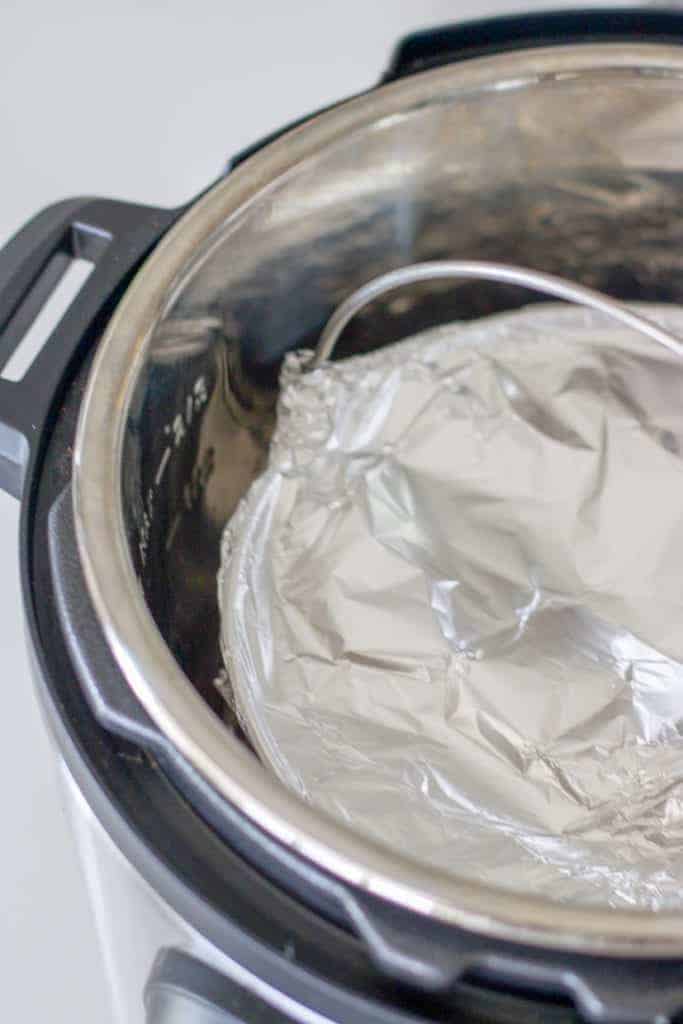
Cover those Oreos with the rest of your batter, then cover tightly with foil. Now, you’re ready to cook in the Instant Pot.
Pressure Cooking Oreo Cheesecake
The cheesecake will steam in the Instant Pot for 40 minutes (30 minutes on high pressure, followed by a 10 minute natural pressure release).
After your cheesecake is cooked, be sure to allow it to cool at room temperature for at least 2-3 hours, then refrigerate overnight.
Chocolate Ganache
Once it’s fully cooled, it’s time for ganache!
Make the chocolate ganache by combining steaming heavy cream with chocolate chips.
I used semi sweet chocolate chips for this recipe, but you could also use white chocolate chips for a white chocolate ganache. Both would be delicious.
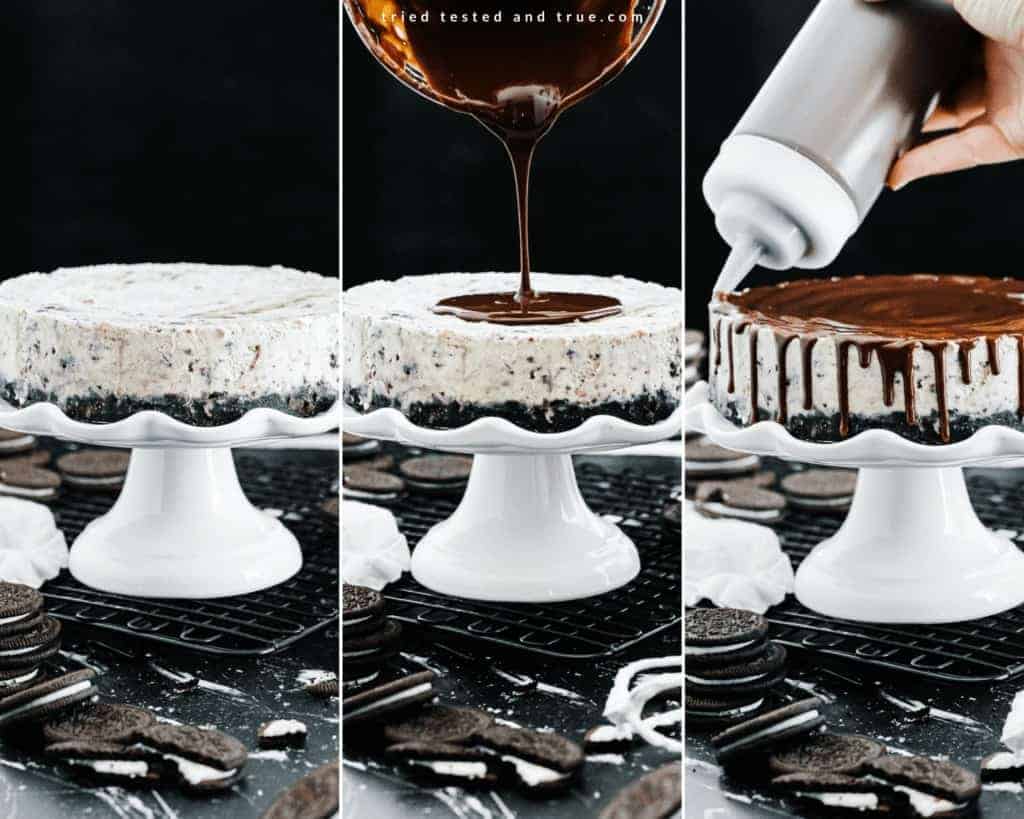
Pour the steaming cream over the chocolate, and set it aside for about 3 minutes, then mix to combine. Let it cool for just a couple more minutes, then you can top your cheesecake.
Depending on the look that you want to achieve, you can spread the ganache a couple of different ways. For a complete covering, pour the ganache right over the top of the cheesecake and spread it with a flat knife or icing spatula.
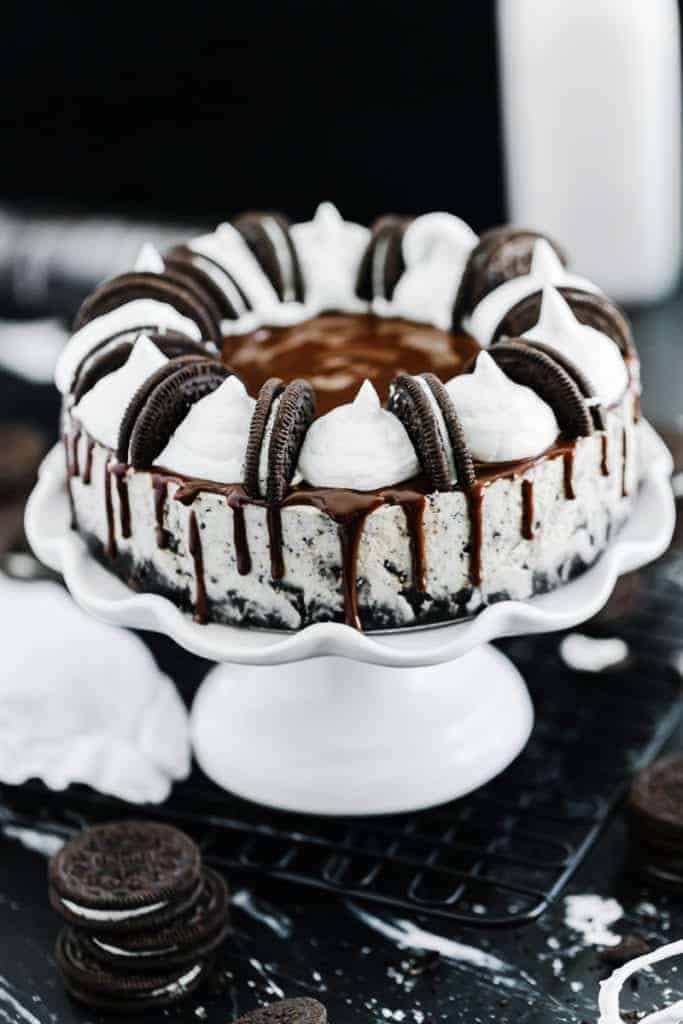
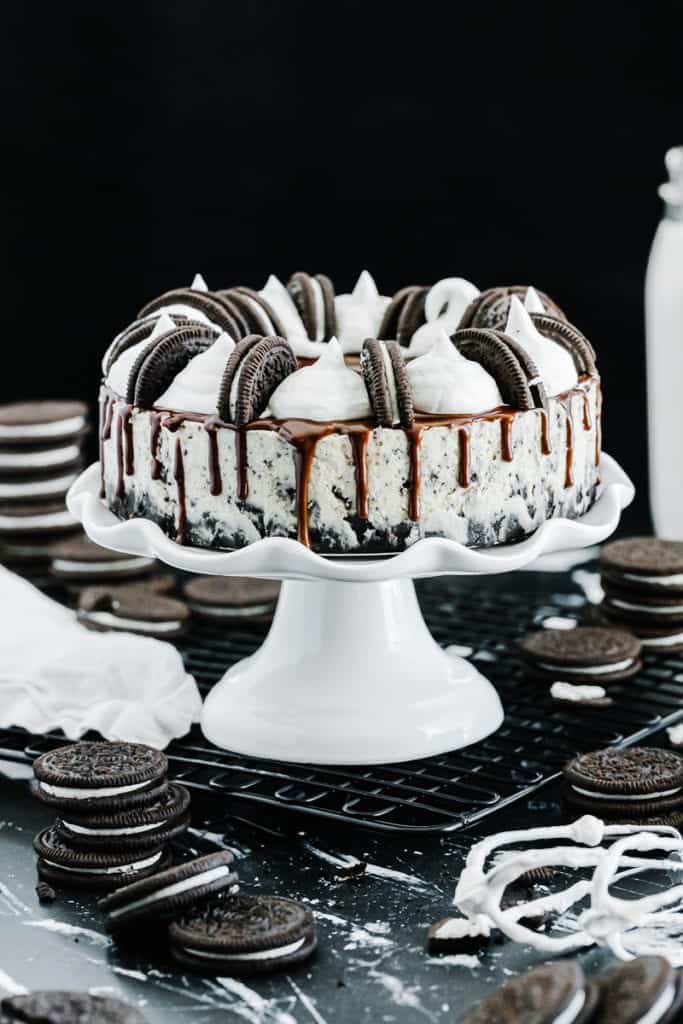
For a drip effect, use a spoon or squeeze bottle and squeeze or spoon the ganache along every ½ to 1 inches of the edge. You can pour the rest of the ganache into the center, or decorate however you’d like!
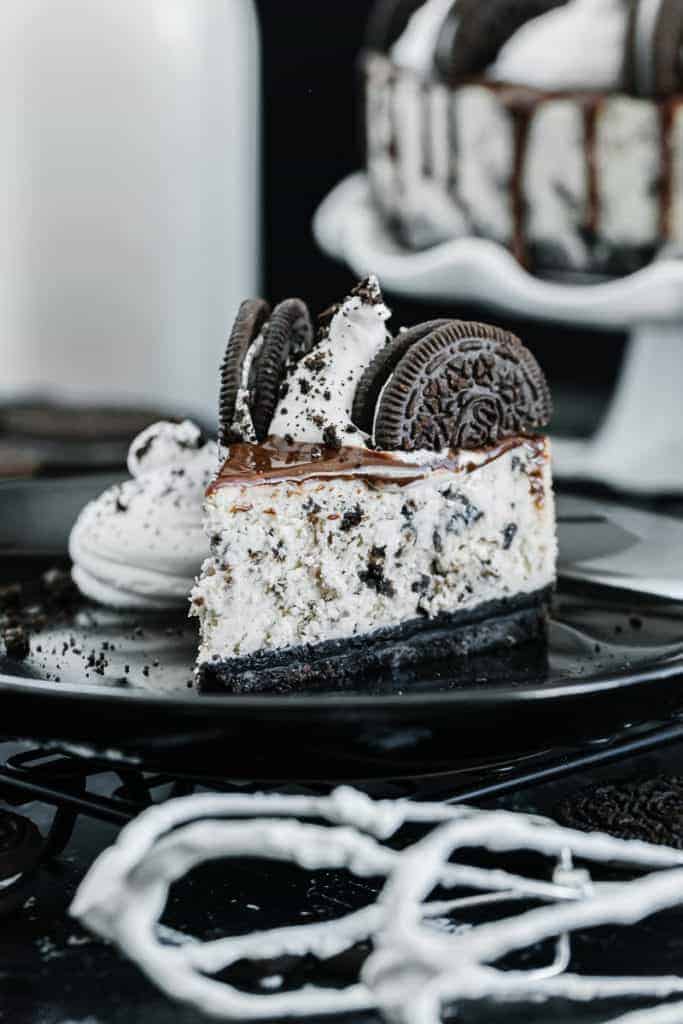
Serving oreo cheesecake
I like to top my Oreo cheesecake with fresh whipped cream. For a final touch, I add several whole or halved Oreos onto the top of the cake.
Try my other Instant Pot cheesecakes!
If you haven’t already tried my Classic Instant Pot Cheesecake recipe, you should definitely check it out.
Also try my Instant Pot Pumpkin Cheesecake and my Instant Pot S’mores Cheesecake recipes—I promise you won’t be disappointed!
More delicious Instant Pot desserts
- Instant Pot Key Mini Lime Pie
- Easy Instant Pot Mango Sticky Rice
- Instant Pot Creme Brulee
- Instant Pot Pumpkin Rice Pudding
- Homemade Carrot Cake (Instant Pot)
- Dairy Free Coconut Rice Pudding (Instant Pot)
- Instant Pot Chocolate Lava Cakes For Two
- Instant Pot Vanilla Bean Rice Pudding

Instant Pot Oreo Cheesecake
Love Oreos? Try Oreo Cheesecake! This Instant Pot Oreo Cheesecake recipe combines the best of both—and it couldn’t be easier.
Print
Pin
Rate
Servings: 8 servings
Calories: 799kcal
INGREDIENTS
Crust
- 12 Oreo cookies
- 3 tablespoons butter melted
Filling
- 16 ounces cream cheese softened (2 blocks)
- 3/4 cup sugar
- 1/2 cup sour cream
- 1 tablespoon flour
- 2 teaspoons vanilla
- 1/4 teaspoon salt
- 2 eggs room temperature
- 17 Oreos divided
Chocolate Ganache
- 1/2 cup heavy cream heated until steaming
- 4 ounces semi-sweet chocolate or, white chocolate for a white chocolate ganache
Whipped Cream
- 3/4 cup heavy cream chilled
- 2 tablespoons powdered sugar
- 1 teaspoon vanilla
Topping
- 6 Oreos for topping
INSTRUCTIONS
For Crust:
- Place Oreos into a blender and blend until powdered. Slowly stream in the melted butter until fully incorporated. Alternatively, place the Oreos into a gallon sized bag and crush with a rolling pin or cup.
- Press the crust into a 7 inch cheesecake pan (springform or push pan). I prefer to use the bottom of a flat glass to push the crust evenly into the pan. If you would like the crust to go up the sides of the pan, press the crust with your fingers. Set aside while assembling the filling.
For Filling:
- In a large bowl, beat together cream cheese and sugar using an electric mixer. Scrape down the sides of the bowl constantly to avoid chunks in the batter. Add sour cream, flour, vanilla, and salt. Blend until smooth. Add eggs and blend just until combined. Take 12 of the Oreos and pulse them in the blender or crush them into smaller chunks. Add the cookie pieces and fold into the batter.
- Pour about half of the filling mixture on top of the crust. Then, evenly place 5 whole Oreos on top of the batter. Top with the remaining batter.
- Cover the pan tightly with foil. Place a trivet into the Instant Pot, and add 2 cups of water to the pot. Alternatively, use a silicone sling. Place the cheesecake into the pot on top of the trivet.
- Lock the lid, turn the knob to sealing, then cook on high pressure for 30 minutes. Allow a 10 minute natural pressure release.
- Carefully remove the cheesecake from the pot and allow to cool at room temperature for 2-3 hours, then refrigerate 8 hours or (preferred) overnight.
- When ready to serve, use a wet, hot knife to loosen the cheesecake from the pan and place on a serving plate.
For Ganache:
- Combine heated cream and chocolate in a medium size bowl. Let stand for 2 minutes, then mix together until completely melted. Pour the ganache over the top of the cheesecake and spread. For a drip, use a spoon and drip a spoonful of the ganache every 1/2-1 inch on the edge of the cheesecake. Then, pour the remaining ganache into the center of the cheesecake and spread toward the edges.
For Whipped Cream:
- Combine whipped cream ingredients in a medium bowl and whip until you get stiff peaks. Either dollop or pipe the whipped cream on top of the ganache, then place whole or halved Oreos on top of the cake as desired.
PRODUCTS WE LOVE
NUTRITION
Serving: 1g | Calories: 799kcal | Carbohydrates: 72g | Protein: 9g | Fat: 56g | Saturated Fat: 30g | Polyunsaturated Fat: 14g | Trans Fat: 1g | Cholesterol: 166mg | Sodium: 509mg | Fiber: 2g | Sugar: 53g
Tried this recipe?Mention @triedtestedandtrue!
Leave a Reply

Hi! I'm Lisa!
I founded Tried, Tested, and True in 2019 to help moms like me develop confidence and joy in the kitchen.
Since then, I have taught millions of home cooks around the world through our tried and true recipes and Youtube tutorials.
In 2021, I wrote my first book called, “I Love My Instant Pot: Cooking for One”!
Read My Full Story
Learn More About My Cookbook


I was apprehensive to try something without reviews, however I trust Lisa after trying a few of her recipes. Made this last weekend for my son’s birthday, without the ganache because he couldn’t wait to eat it. It was very good, texture was nice and creamy, cooking time/pressure release was right on the mark. I don’t have a push pan, I have a 7″ springform so it was pretty full going in. If not for the tight foil, it probably would have overflowed a bit. Very, very good and will definitely make again! Thank you Lisa!!